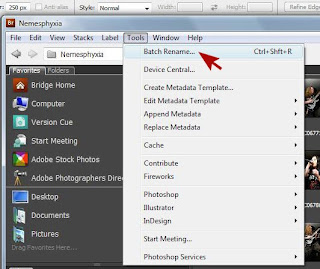
Select and open the folder containing the files you wish to rename.

Press 'Tools', then select 'Batch Rename' (Ctrl+Shft+R).

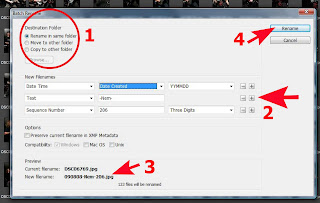
1. Select the Destination Folder. Here I have selected 'Rename in same folder' because I don't need to keep a copy of the original file names.
2. Enter how you would like to rename your files. I choose to name mine with the year, month, and date (yymmdd) the images where taken for filing purposes. I then choose a few letters that will tell me a bit about the subject of the images. For example here these images are of the band Nemesphyxia so I have used 'Nem' for my text. Then select the sequence number you would like to use for your images. I usually use 3 numbers here depending on how many files there are. You can start at any number you wish, just enter it into the box. Here you can see my image numbers start at 206, I changed it to 0 after this screen shot was taken
3. Here you will see the current file name and an example of what your new file name will read like.
4. Press rename

In no time at all your done! All of the images in that selected folder have been renamed.


