Open Photoshop then click on the Adobe Bridge icon (Br) to open that workspace.
Select and open the folder containing the files you wish to rename.
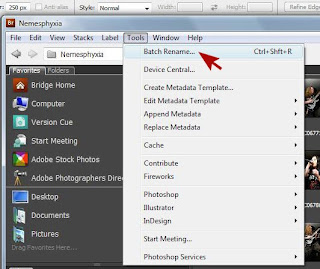
Press 'Tools', then select 'Batch Rename' (Ctrl+Shft+R).
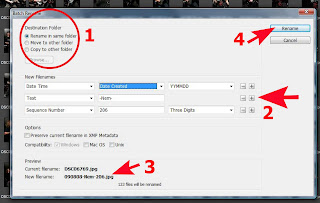
1. Select the Destination Folder. Here I have selected 'Rename in same folder' because I don't need to keep a copy of the original file names.
2. Enter how you would like to rename your files. I choose to name mine with the year, month, and date (yymmdd) the images where taken for filing purposes. I then choose a few letters that will tell me a bit about the subject of the images. For example here these images are of the band Nemesphyxia so I have used 'Nem' for my text. Then select the sequence number you would like to use for your images. I usually use 3 numbers here depending on how many files there are. You can start at any number you wish, just enter it into the box. Here you can see my image numbers start at 206, I changed it to 0 after this screen shot was taken
3. Here you will see the current file name and an example of what your new file name will read like.
4. Press rename
In no time at all your done! All of the images in that selected folder have been renamed.
Tuesday, September 1, 2009
Friday, July 3, 2009
How to Save Wet Electronics
SAVE WET ELECTRONICS WITH RICE
If your camera, cell phone, or other device accidentally gets wet when you’re traveling (or at home), try the following tricks to save wet electronics:
** 1. Do NOT turn it on if it’s wet. Remove the battery and memory card and leave all the doors and covers on the device open so it can dry.
** 2. Vacuum it out. If you try drying the device with a fan or a blow dryer, you risk pushing moisture deeper onto the circuitry. This could cause a short. Instead, pull moisture away from the device with a vacuum.
** 3. Bury it in rice. Rice absorbs moisture from nearby objects. If your camera gets wet, drop it into a container of rice and let it sit for a day. The rice will help pull the moisture out.
** 4. Power it back up. After your camera or phone spends a full day submerged in rice, reinsert the battery and cards, and turn it on. If it doesn’t work, call the manufacturer. Don’t try to hide the fact that it got wet. There are internal indicators in most devices that show water damage.
Article courtesy of The Photographer's Life
View Photos of How To Save Your Electronics with Rice
Tuesday, May 26, 2009
Horse Photography - Capture the Canter
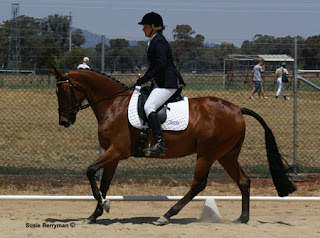
Catching the canter is quite simple. I find there is only one type of canter shot that really works for most horses. This is when the outside limbs are on the ground & the inside hind leg has just hit the ground reaching forward under the horses body. For a lengthened canter or hand gallop you may want to time your shot a little later and for a slow lope like you would find in a Western Pleasure class you will want to shoot much later & time on the leading fore leg rather than the back end.
To get that Canter photograph I time my shot on the outside hind leg. Watch the outside hind leg leave the ground, come up underneath the horse and shoot the second that leg hits the ground. Remember that there are human & camera reaction times to take into account when photographing a fast moving object and this is why you will need to hit that button a few moments before the horse is in the position you are looking to capture.
This type of canter shot is perfect for the ridden canter. When photographing a horse cantering at liberty you can break this rule as much as you like. I have sold many liberty shots of cantering horses that are completely the opposite of how I photograph the ridden canter.
Practice makes perfect!
Susie.
Thursday, May 7, 2009
How to Save For Web in Photoshop
Open the image you want to upload to your site or blog in Photoshop.
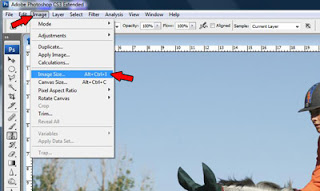
Click on 'Image', scroll down to 'Image Size' & select.
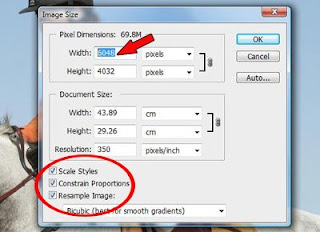
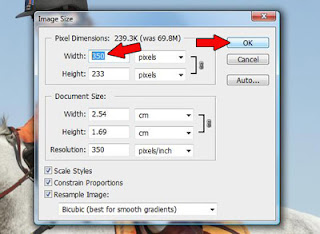
Adjust the image width to between 300 & 500 pixels. Make sure the 'constrain proportions' check box is ticked. Click OK.
Your image will reduce in size.
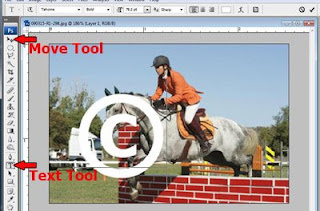
If you want to put a watermark on your image select the 'type tool', click it on your image and enter your text. The keyboard shortcut for the © symbol is Alt 0 1 6 9. To move your text use the 'move tool'.
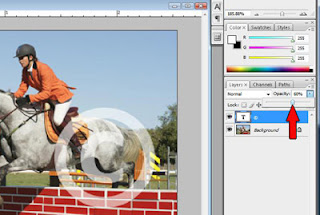
Change the opacity level untill you are happy with your watermark. Mine is set at 60% here.
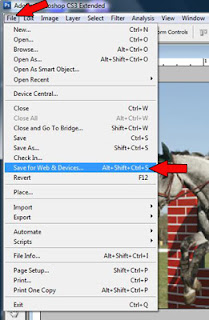
Now click on 'File', then 'save for web'.
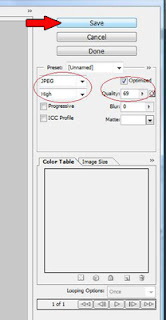
The 'save for web' box will open with your image in it. Select 'Jpeg', 'High', set your quality to 69, and check the 'optimised' box. Click OK, then select the folder you want the image to be saved to.
Your done! Now start uploading.
Labels:
photoshop,
save for web,
save images for web,
watermark
Friday, May 1, 2009
Bright - a new kind of hospitality
Last weekend I was invited to photograph the Alpine Riding Club’s Dressage and Showjumping Combined Training Day. The weather was challenging to say the least. It rained nearly all day and I was saturated and freezing cold by the time it came to go home. It was testament to the dedication and competitiveness of the Alpine riders who showed up to ride their horses in such treacherous conditions. I found myself intermittently giggling at what seemed to be utter stupidity on my part; running around in the rain with expensive camera equipment as I proceeded to get absolutely drenched. ARC’s brand new sand arenas held up fantastically to the amount of water that had been dumped on them that day, and the preceding couple of days too. Overall it was an incredibly inspiring day and the the beautiful, quality horses competing there made my job as photographer a much easier one.
Victoria has all ways been a huge favourite of mine especially when it comes to photographing horse events there. The People in Vic have always been so jovial and welcoming to me every-time I step foot in one of their arenas. Last weekend however took the friendly Victorian spirit to a whole new level. Not only did I get the usual amicable hospitality that is generally the norm at Vic shows, I also got a kiss on the cheek! And I must ashamedly admit that I quite liked it. So, for my next Vic Horse Event, I’ll be aiming for two kisses to make me feel super special!
Congratulations to all the winners, riders, and the ARC for putting on such a brilliant event and making it work so well despite the precipitation.
Here’s to Drier Dressage!
Susie.
Wednesday, April 29, 2009
Horse Photography - Getting those ears forward.
This can be one of the hardest things when it comes to photographing horse portraits.
When I go to an equine photography portrait session I have a number of different objects I take with me in my 'bag of tricks' because what works for one horse may not work for another, and what works once may not work the second time.
Some of the things that may help get your equine subjects ears forward are a plastic bag, a coke bottle filled with pebbles, a squeaky dog toy, feed bucket, a handful of hay, another horse, a leafy branch, and a treat like apple or licorice. Use your imagination, anything that makes a noise or smells good to a horse will generally get a reaction.
Always test your ear pricking paraphernalia slowly and some distance from the horse before attempting to use it to ensure it will not frighten and spook the horse.
If you don't have a helper with you and don't want the horse looking directly at the camera you can throw an item into the air to land on the ground where you want the horse to look, or you can kick it along the ground to keep your hands on the camera ready for that shot.
If your subject is a stallion you will find the best results will be found by moving or placing a mare some distance in front of him. This will not only get his ears forward but will also get him to arch his neck and pump up his muscles, making him look more masculine.
Most importantly, always be ready! Even the most difficult horse will put his ears forward at some stage. If you're not ready with your finger on the trigger, you just might miss it.
Satiable Shooting!
Susie.
Ruste Photo & Art
Subscribe to:
Posts (Atom)